Quick Summary:
- Photograph all four sides, roof, bumpers, and close-ups of any marks.
- Capture each wheel, tyre sidewalls, and kerb rash on rims.
- Take clear shots of windscreen, windows, mirrors, and existing chips.
- Record interior wear, fuel level, mileage, and warning lights before leaving.
When you pick up a rental car in Las Vegas, the quickest way to avoid disputes later is to create a clear photo record that matches the condition report. Desert sun, bright forecourt lighting, and a busy airport environment can make small damage easy to miss, so a systematic approach helps. This guide gives a fast, reliable photo checklist for car hire pick-up, plus simple steps to ensure anything you find is recorded before you drive away.
If you are collecting at the airport, allow a few extra minutes for this process, even if your flight has been delayed. For travellers arranging a vehicle through Las Vegas airport car rental options, it is especially useful to do your photos while the car is still in the pick-up bay, with staff nearby if you need an amendment to the paperwork.
Before you start: set up photos that are usable
A good set of images is not about quantity, it is about clarity and context. Use your phone’s normal camera mode, not a heavily filtered setting. Turn on location tagging if you are comfortable with it, and ensure the date and time are correct. If possible, take photos in shade or with the sun behind you to reduce glare. In Las Vegas, harsh midday light can wash out scuffs, and evening pick-ups can hide scratches unless you use good lighting.
Start with two “proof” shots that anchor everything else: a wide photo of the whole car with the number plate visible, and a photo of the dashboard showing the mileage and fuel gauge. If your phone supports it, a short walkaround video can complement still images, but keep stills as your primary evidence because they are easier to reference.
Exterior checklist: walkaround photos that cover the entire body
Work in a consistent order so you do not miss anything. Stand back for wider photos, then move in for close-ups. The goal is to show both the damage and where it is on the vehicle.
1) Four corners and both sides
Take a wide photo of each corner at roughly a 45 degree angle, front-left, front-right, rear-left, rear-right. Then take a straight-on photo of the left side and right side. These images show panel alignment and obvious dents.
2) Bumpers, grille, and lower edges
Front and rear bumpers collect scrapes from parking blocks. Photograph the full bumper, then crouch slightly to capture the lower lip. Include the grille area and fog light surrounds, which can crack without being obvious at first glance.
3) Bonnet, roof, and boot lid
In Las Vegas, cars can have sun-faded paint or small dings that are easiest to see from above. Photograph the bonnet and boot lid from a slight angle. If you can safely do so, take a photo of the roof, especially on SUVs where roof rails can be scuffed.
4) Door edges, handles, and mirrors
Open each door carefully and photograph the outer edge and sill area. Door edge chips are common and can be disputed if not recorded. Take close-ups of door handles and mirror housings, and a wide shot that shows the mirror on the car, not just a cropped scratch.
5) Number plates and any stickers
Photograph the front and rear number plates. Also photograph any existing rental stickers, barcodes, or damage markers. If the condition report uses little circles or arrows stickers to indicate damage, capture them clearly so your photos tie to the report.
If you are choosing among different providers through car hire in Las Vegas, the pick-up process can vary by desk and car park layout. Regardless of provider, the same principle applies: wide shots for context, close-ups for detail, and enough images to show there is no “mystery area” left undocumented.
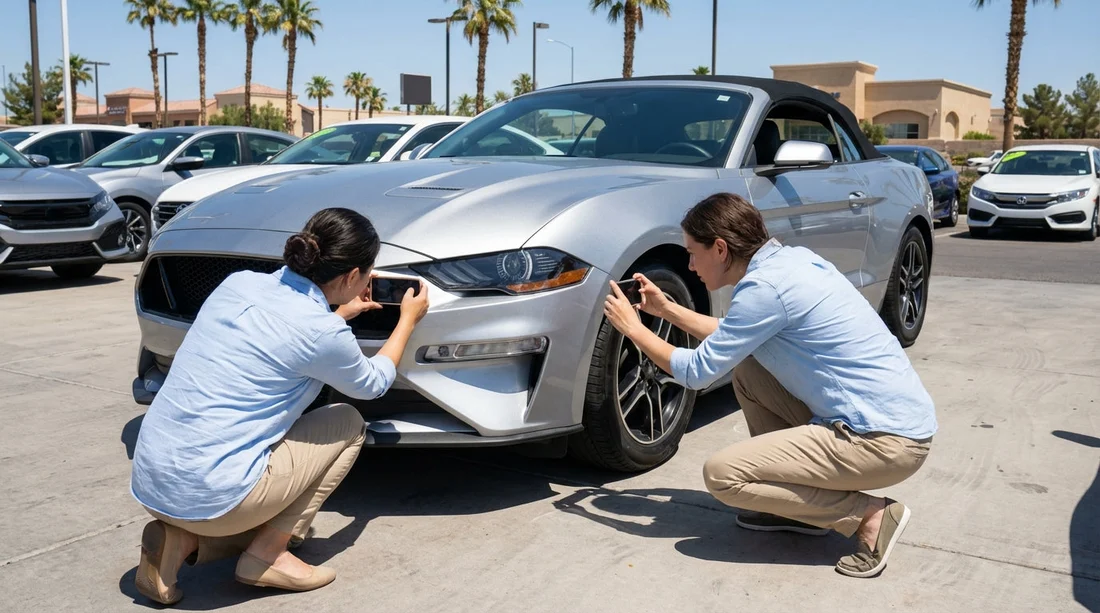
Wheels and tyres: the most disputed area after bumpers
Wheels are often the first place charges arise, because kerb rash can happen easily in car parks and at hotel drop-offs. Photograph each wheel individually, and be deliberate.
1) Each wheel face
Take a straight-on shot of the full wheel, filling the frame, so any scuffs are visible. Then take a second close-up of any scrape, with the valve stem or a spoke pattern visible to prove which wheel it is.
2) Tyre sidewalls and tread
Photograph the tyre sidewall for cuts or bulges. A quick tread photo is useful if there is uneven wear or if you notice a low tyre. In hot weather, tyre issues can worsen quickly, so it is important to have proof of condition at pick-up.
3) Under the bumper near the wheels
Turn the steering slightly and photograph the wheel arch liners if you see rubbing, missing clips, or cracks. This is a common hidden area on larger vehicles, including options you might compare on SUV rental in Las Vegas pages.
Windscreen, windows, and lights: capture chips, cracks, and haze
Glass damage is easy to miss in bright sun and can be costly. Take your time here.
1) Windscreen overview plus close-ups
Take one photo of the full windscreen from outside, then one from the driver’s seat looking forward, to show clarity. After that, scan for chips, especially near the lower edge where wipers sit. If you find a chip, photograph it close-up, then step back and take a second photo showing its position relative to a corner or the rear-view mirror mount.
2) Windows and mirrors
Take quick photos of each side window and the rear window. For mirrors, capture the mirror glass and the casing. Look for scratches that could be interpreted as impact damage.
3) Headlights, tail lights, and indicators
Photograph each light unit close-up. Cloudy headlight lenses, cracks, or moisture inside a lens should be documented. If possible, turn on the lights and take a photo showing they work, especially if you will drive at night outside the Strip.
Interior: document cleanliness, wear, and functionality
Interior claims are less common than exterior, but they do happen, especially for stains, tears, smoke smells, or missing accessories. Your photos should show overall condition and any pre-existing issues.
1) Dashboard: mileage, fuel, warning lights
Photograph the instrument cluster with the car on, showing mileage and fuel level. If any warning lights are illuminated, photograph them clearly. If the car uses a digital fuel gauge with bars, capture it as well as any “range” estimate displayed.
2) Seats, carpets, and boot
Take wide photos of the front seats, rear seats, and the carpeted floor areas. Then take close-ups of any stain, tear, or heavy wear on bolsters. Photograph the boot area, including the parcel shelf if present. If there is a spare wheel, jack, or inflator kit, capture it in place.
3) Controls and screens
Photograph the infotainment screen, especially if it is scratched or has dead pixels. Take a photo of the centre console showing the gear selector area, cupholders, and any missing trim. If there are USB ports or a charging cable provided, note and photograph what is present.
4) Keys, fobs, and accessories
Photograph the key fob(s) and any damage to them. If the car comes with a toll tag, parking pass, or remote garage opener, photograph it in the vehicle. Missing accessories are easier to contest with a pick-up photo record.
If you are comparing provider options, such as those referenced on Avis car rental in Las Vegas pages, the interior condition standard can vary by vehicle class and turnover time. Your goal is not to judge the car, it is to accurately document what you received.
Make sure the condition report matches your photos
Photos help, but the strongest protection is getting the existing damage written on the condition report before you leave the lot. Use this quick process:
1) Compare panel by panel
With your photos taken, review the condition report and match it to each area. If the report uses a diagram, ensure the damage is marked on the correct section, for example rear bumper versus rear quarter panel.
2) Ask for amendments immediately
If you find unrecorded damage, return to the desk or attendant while the car is still parked in the pick-up area. Politely request the report be updated, and ask for a copy of the updated version. A photo of the revised report is useful as a backup.
3) Photograph the paperwork
Take a clear photo of the condition report page that shows the diagram and notes. Also photograph the rental agreement section that shows fuel policy and return expectations, because fuel disputes are common.
4) Do a final walkaround before you drive off
After any changes are documented, do one last slow walkaround and take two or three additional wide shots. This confirms the car’s state at the moment you departed.
These steps are useful whether you are renting in the city or planning a longer Nevada road trip arranged through car hire in Nevada listings. If you are heading into areas with gravel pull-offs or construction, your pick-up evidence becomes even more valuable.
Las Vegas-specific tips that make your photos more reliable
Watch for glare and reflections
Casino and garage lighting can create reflections that hide dents. Move a step left or right and retake the photo if the panel looks “too perfect” in the image.
Check for sandblasting on the front end
Desert driving can cause small pitting on the front bumper, bonnet edge, and windscreen. If you see it, take close-ups so it is clear it was pre-existing.
Look at parking rash on the passenger side
Kerbs and tight spaces often affect the passenger-side wheels. Photographing all four wheels thoroughly is the safest approach, even if only one looks marked.
Do not forget the underside of front bumper
Low scrapes are hard to spot unless you crouch. A quick photo from a low angle can save hassle later.
FAQ
How many photos should I take at rental car pick-up in Las Vegas?
Usually 25 to 40 clear photos is enough: wide shots of each side and corner, close-ups of any damage, all wheels, all glass, and key interior items like mileage and fuel.
Should I take photos before or after signing the paperwork?
Take photos as soon as you have access to the vehicle, and confirm the condition report reflects what you found before you drive away. If you sign first, still get the report updated immediately if you spot anything.
What damage areas are most often missed on a condition report?
Lower bumper scrapes, kerb rash on rims, small windscreen chips, and door edge chips are commonly overlooked. These areas deserve extra close-ups with context.
Is a walkaround video better than photos?
A video is a helpful supplement, but photos are easier to zoom, timestamp, and match to the report diagram. Use both if you have time, with photos as the core record.
What if the car is dirty and I cannot see small scratches?
Photograph the dirtiness itself and note it with staff, then focus on visible damage, wheels, and glass. If something looks questionable under the dirt, take a close-up and request it is recorded.


