Quick Summary:
- Follow rental return signs, park in the correct lane, and note the bay.
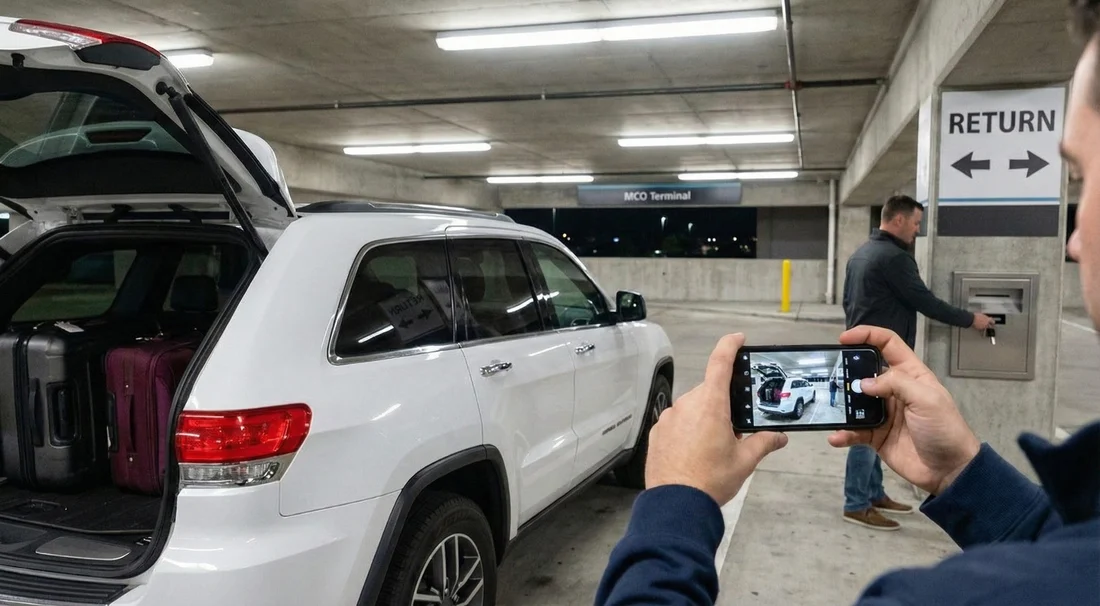
- Take timestamped photos of fuel gauge, mileage, and all exterior panels.
- Drop keys in the marked box, keeping any sleeve or receipt stub.
- Save your final fuel receipt and a screenshot of your check-in time.
Late-night flights, delayed meetings, and theme park days that run long mean many travellers finish their Orlando car hire outside desk hours. At Orlando International Airport (MCO), after-hours returns are designed to be simple, but you also need to protect yourself. Once you leave the garage, you cannot easily prove the condition, mileage or fuel level you returned with.
This guide explains how after-hours returns typically work at MCO and gives you a step-by-step checklist so you can document everything: where you parked, what you photographed, how to drop keys, and what to keep for your records. If you are comparing options for Orlando Airport returns, see the location details on car rental Orlando MCO and the alternative landing page car hire airport Orlando MCO for the same airport context.
How an after-hours return at MCO works, in plain terms
At MCO, most rental companies operate from the on-airport rental car centre and parking garages. When counters are closed, you still return the car to the same return area. You park in the appropriate lane or row for your brand, remove your belongings, lock the vehicle, and place the key fob in a designated drop box.
No agent may check the vehicle immediately. Your return is typically processed later when staff are back on shift. That gap is why your own evidence matters, especially for fuel level, mileage, and any existing scuffs that could otherwise be attributed to you.
After-hours returns are not meant to be stressful, but they are detail-sensitive. The easiest way to stay organised is to treat the return like a short audit: confirm the location, confirm the time, confirm the car’s state, then confirm the key handover.
Before you drive into the return area: prep your proof
Do these steps while you still have a few minutes, ideally before you enter the garage queue. They prevent mistakes like forgetting a receipt or having no light for photos.
1) Charge your phone and enable timestamped photos. Many phones store date and time in image metadata, but it helps to also take one photo that visibly shows the time. A simple way is to photograph the car with your lock screen clock visible in the frame, or take a screenshot of your phone time right after you park.
2) Gather your contract details. Have your rental agreement number and the vehicle plate handy. If your booking is through Hola Car Rentals, keep the confirmation email accessible offline in case reception is patchy in the garage.
3) Plan your fuel stop. Most fuel disputes come from assumptions. If your agreement requires a full-to-full return, refuel close to the airport and keep the receipt. Pick a station within a short drive so the gauge does not drop during the final miles in traffic.
4) Clear the cabin. Remove chargers, sunglasses, toll transponders you brought, and rubbish. A fast sweep avoids the common after-hours issue of losing items with no staff present to help immediately.
Step-by-step: returning your car after hours at MCO
Follow this sequence once you are on airport roads. It is written to help you prove condition, mileage and fuel level even if the return is processed the next day.
Step 1: Follow the right signs and enter the correct return lane. Watch for “Rental Car Return” signs first, then brand signs. If more than one brand shares the same operator area, double-check the overhead lane markers. Parking in the wrong section can delay closure of the contract.
Step 2: Stop, breathe, and record your location. Before unloading, note the bay number, lane letter, or nearest pillar marker. Take a quick photo of the signage showing the brand and the row. If you later need to explain where the car was left, this single image helps.
Step 3: Photograph the mileage. Switch the ignition to accessory mode and photograph the odometer clearly. If the display cycles, take two photos. This is your best proof against unexpected extra miles or distance-based charges after you return.
Step 4: Photograph the fuel gauge (and range if shown). Take a close, glare-free photo of the fuel gauge. If your dashboard shows “miles to empty” or fuel percentage, capture that too. If you refuelled moments earlier, also photograph the fuel receipt next to the car key fob for a tidy evidence set.
Step 5: Photograph the exterior in a full loop. Walk clockwise around the vehicle and take photos of each panel, plus wider shots for context. In low light, enable flash or use garage lighting. Pay extra attention to bumpers, wheels, and the windscreen because chips and kerb rash are common dispute points. Include the roof if you hired an SUV, as luggage scrapes and low-clearance marks can happen in garages.
Step 6: Photograph the interior briefly. Take two or three photos showing the front seats, rear seats, and boot area. This helps if there are later cleaning fees questioned, and it also reminds you that you left no belongings behind.
Step 7: Lock the car and film the final walk-away. A short video can capture the locked car, the bay marker, and the surrounding context in one go. Keep it under 20 seconds. This is particularly useful if you are returning during rain, when exterior marks may be harder to see in still photos.
Step 8: Use the correct key drop box and document the handover. The drop box is usually near the walkway or kiosk area. Place the key fob inside the envelope or sleeve provided, if available, and write the requested details legibly. Take a photo of the drop box signage, then a final photo of your hand holding the envelope at the box. Do not photograph personal payment details, just the fact that you returned the keys to the correct place.
Step 9: Save your time proof. Immediately after dropping the keys, take a screenshot showing the current time and date. If you also have a parking garage sign with a clock, photograph it. This can help if there is confusion about whether you returned before the daily cut-off.
Keys: what to do with the fob, and what not to do
After-hours key return is straightforward, but small errors can cause big headaches.
Do: return the key fob only, unless you were given additional items that must be returned (for example, a separate key, parking pass, or a GPS unit). If you received two keys, return both. Keep any detachable retailer tags that are clearly marked as yours, not the rental company’s.
Do not: leave the key in the car, hide it under a mat, or leave it with a shuttle driver. If the vehicle is moved before check-in, proving your return becomes harder.
Tip: if the key sleeve has a tear-off stub, keep it. Photograph it too. Even if it is not an official receipt, it supports your timeline.
Photos: the minimum set that actually helps in disputes
Many travellers take dozens of photos but miss the crucial ones. For after-hours car hire returns, the most useful set is small and specific.
Must-have photos: odometer, fuel gauge, front bumper, rear bumper, each side panel, all four wheels, windscreen, and a wide shot showing where the car is parked. Add the bay marker or pillar sign in at least one photo.
Nice-to-have photos: roof, under the front bumper area, and any existing damage you noted at pick-up. If you already photographed pre-existing marks on collection, keep those images in the same album as your return images.
Lighting note: garages can produce reflections that hide dents. Take one photo from slightly different angles for each side, or use a short video pan to show the surface condition.
Fuel: proving the level and avoiding the most common fees
Fuel is the number one after-hours concern because no agent is there to confirm the gauge. Your goal is to show you complied with the agreed fuel policy.
If you must return full-to-full: refuel within a short distance of MCO, keep the receipt, and photograph the gauge at the return bay. Even a tiny drop from “Full” can happen after a few miles, so the combination of a nearby receipt and a clear gauge photo is your strongest evidence.
If you prepaid fuel: you may not need to fill up. Still photograph the gauge and keep the agreement terms accessible. This prevents confusion if a later email assumes a full return was required.
If your vehicle is electric or hybrid: photograph the charge level and the estimated range. If there is a requirement to return with a minimum percentage, this is the equivalent of a fuel gauge photo.
Mileage and tolls: what to capture before you leave
Mileage matters for any plan with distance limits, and it is also a quick indicator the car was not driven after you dropped it off. Alongside the odometer photo, capture:
Your route context: a screenshot of your phone map timeline showing arrival at MCO can help if there is ever a query about timing. Keep it for a week, then delete it if you prefer.
Toll programme details: Orlando roads often use electronic tolling. If your rental included a toll pass or toll programme, keep the documentation. Do not leave your own toll transponder in the car by mistake.
For travellers planning theme park routes, comparing vehicle types can also affect toll and parking costs. If you hired a larger car for luggage and family gear, this overview on SUV rental Disney Orlando MCO is useful context for typical airport pick-up and return patterns.
What happens after you drop the keys
Once the key is in the drop box, the rental company usually checks the vehicle later. They will log the return time based on their system rules, check fuel, scan for damage, and close the contract. You might receive an emailed receipt within hours or by the next day, depending on staffing and your contact details.
If the receipt does not arrive, keep calm and rely on your evidence set. Your photos, timestamp, bay location shot, and fuel receipt are enough to support a correction if something is recorded incorrectly.
If you booked a specific brand through Hola Car Rentals, you may also find it helpful to read the brand-specific airport notes. For example, see Payless car hire Orlando MCO and Enterprise car rental Disney Orlando MCO for service context that can influence where you look for lanes and drop boxes.
Troubleshooting: common after-hours return problems at MCO
You cannot find your company’s return lane. Slow down and follow the overhead signs. If multiple brands share a lane, park where permitted and photograph the signage and bay marker. Do not park in an area marked for a different operator if it is clearly restricted.
The key drop box is not obvious. Look for a kiosk or a wall-mounted box near pedestrian exits. If you are genuinely unsure, photograph the area and the nearest brand sign, then place the keys only in a clearly labelled drop. Avoid leaving keys with security staff unless they instruct you to use a specific drop point.
It is too dark for clear photos. Use flash and take photos close enough to show detail. A short video with a slow pan can sometimes show more than still images in low light.
You returned with the correct fuel but were charged anyway. Send your fuel receipt and gauge photo, with your timestamp and bay photo. Disputes are easier to resolve when you can show a nearby refuel time and a full gauge at the return point.
You forgot to photograph the mileage. If you realise immediately and you are still nearby, go back and capture it if safe and permitted. If you have already left, your time proof and return location evidence still helps, but mileage disputes are harder without an odometer photo.
FAQ
Can I return my Orlando car hire at MCO after hours without speaking to anyone? Yes, most companies allow after-hours returns at the airport rental car centre. You park in the correct return area and use the designated key drop box.
Where do I put the keys during an after-hours return at MCO? Use the clearly marked drop box for your rental company or operator area. Place the fob in any provided sleeve, then keep any stub or take a photo confirming the drop location.
What photos should I take to prove condition, mileage and fuel? Photograph the odometer, fuel gauge, each exterior side, bumpers, wheels, and a wide shot showing the bay marker. Add a short video walk-around if lighting is poor.
Do I need a fuel receipt for an after-hours return? If your agreement requires full-to-full, a nearby fuel receipt plus a clear gauge photo is the strongest proof. If you prepaid fuel, a gauge photo still helps avoid misunderstandings.
When will I receive my final receipt after dropping the car off late? It is usually emailed once staff process the return, often within hours or by the next day. Keep your photos and timestamp until the final receipt matches your return details.


