Quick Summary:
- Locate lower anchors in seat bight, and confirm weight limits.
- Find the top tether point, and verify clear routing behind seat.
- Test seat-belt locking mode or locking clip compatibility before driving.
- Confirm the installed seat moves less than one inch at belt path.
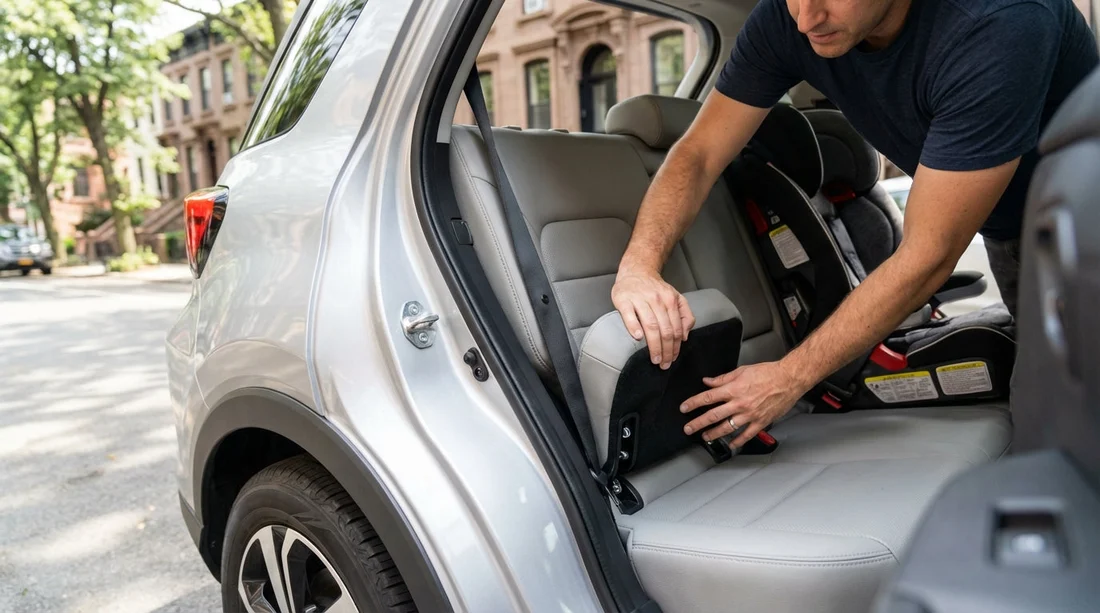
Hiring a car in New York with a child seat is straightforward once you know what to inspect. In the US, the system equivalent to ISOFIX is called LATCH, which stands for Lower Anchors and Tethers for Children. Many vehicles will have LATCH in at least some seating positions, but not always in the one you expect, and not always with easy-to-see labels. The goal before you leave the lot is simple: confirm you can achieve a tight, correct installation using either the lower anchors or the seat belt, plus the top tether when required.
If you are collecting from a major pickup point, you may be comparing options across airports and vehicle types. Hola Car Rentals pages for car rental at New York JFK and car hire at JFK Airport are useful references when planning which category best fits your family setup. For larger seats, more luggage, or three-across considerations, you might also browse van hire at New York JFK or, if you are travelling via New Jersey, SUV hire near EWR. Whatever you drive away in, the checks below stay the same.
ISOFIX vs LATCH in New York car hire, what to expect
ISOFIX is the term many travellers know from the UK and Europe. In the United States, you will mostly see LATCH terminology, but the concept overlaps: two lower anchor bars in the vehicle seat, plus a top tether anchor for forward-facing seats. Some cars also allow “borrowing” anchors for a centre seat, but many do not, so you should never assume a middle position has LATCH.
Also note that LATCH is not always the best choice for every stage. Lower anchors have weight limits that include the child plus the car seat. Once you exceed that limit, you typically switch to installing with the vehicle seat belt, while still using the top tether for a forward-facing harnessed seat. If you are unsure, check the child seat label and the vehicle owner’s manual, which rental companies often keep in the glovebox or infotainment manual section.
Where to find lower anchors (the “L” in LATCH)
Lower anchors are metal bars, usually set about 11 inches apart, located in the seat bight, the crease where the backrest meets the seat cushion. In many vehicles they are marked with a small button or tag showing a child-seat icon. In others, they are unmarked and slightly buried between cushions, so you may need to feel with your fingers.
Before committing to an installation, check three things:
1) Which seating positions actually have lower anchors. Commonly, the two outboard rear seats have them. Some vehicles have them in the third row too, and some have one additional set for a centre position. Do not attach to anything that is not an official anchor, such as cargo tie-downs or seat frame parts.
2) Access and angle. If the anchors are deep and the seat cushions are stiff, you may struggle to get the connectors properly seated. A connector that looks attached but is only clipped to fabric or trim is not safe. Confirm both connectors are fully engaged on the metal bars and cannot be pulled off by hand.
3) Lower anchor weight limits. Many US vehicles specify a maximum combined weight for child and seat when using lower anchors. If your child seat is heavy, you can hit the limit sooner than expected. If in doubt, install with the vehicle belt instead, and keep the top tether for forward-facing use.
Where to find the top tether anchor (the “T” in LATCH)
The top tether reduces forward head movement in a crash for forward-facing seats. In SUVs and hatchbacks it is often on the back of the rear seat, the cargo area floor, or the rear sill. In saloons it is usually on the rear parcel shelf behind the headrests, sometimes covered by a small plastic flap.
What to verify:
Correct anchor identification. Tether anchors are often labelled, but do not confuse them with luggage hooks. Look for the tether symbol or check the manual. The anchor should be a reinforced metal point designed for crash loads.
Routing and clearance. The tether strap should route as the vehicle manual instructs, commonly over the top of the vehicle seatback or under a head restraint. Ensure the strap is not twisted and does not run over sharp edges. If the head restraint interferes, check whether it can be raised, removed, or flipped, depending on the car’s design.
Do not skip the tether for forward-facing harnessed seats. Even if the lower anchors or belt feel tight, the tether is a separate, important stabiliser. For booster seats, a tether is generally not used, because the child is restrained by the vehicle belt.
Common US seat-belt locking methods you may see
In New York car hire, you might end up installing with the vehicle belt because the lower anchors are inaccessible, the seating position lacks LATCH, or you are over the lower-anchor limit. US vehicles use a few common ways to lock a belt tightly around a car seat.
Switchable retractor (most common). Pull the shoulder belt all the way out slowly, then let it feed back in. You should hear a clicking sound as it retracts and it should not pull back out freely. This is called Automatic Locking Retractor mode. When you press down on the child seat and feed the belt back in, it tightens and stays tight.
Locking latchplate. Some belts lock at the buckle, not the retractor. You can test this by buckling and pulling on the lap portion near the latchplate. If it holds firm without switching the retractor, you may have a locking latchplate. In this case, you focus on tightening the lap belt while keeping the latchplate flat so it holds.
Lightweight locking latchplate quirks. Certain latchplates can slip if they are at an angle. If the belt loosens, try shortening the lap portion, then rebuckling, or twisting the buckle stalk up to three full twists if permitted by the car seat instructions, to change the geometry and help it lock.
Locking clip use. Some older vehicles lack a built-in locking method and require a locking clip supplied with the child seat. In modern rental fleets this is less common, but it can still happen. If you do not have the clip and the belt will not lock, ask to swap vehicles rather than guessing.
What to check on the child seat before you install
Whether you bring your own seat or rent one, verify it is appropriate for your child and that all parts are present.
Confirm stage and limits. Rear-facing seats have height and weight limits, and many convertibles have different rules for rear vs forward facing. A harnessed forward-facing seat is different from a belt-positioning booster. Ensure you are not relying on a booster for a child who still needs a harnessed restraint.
Check the date and condition. Look for an expiry label and inspect for cracks, missing labels, frayed harness straps, or damaged connectors. If any part looks compromised, do not use it.
Bring what you need. A rolled towel or pool noodle is sometimes permitted for recline adjustment on rear-facing seats, but only if your seat manual allows it. It is best to travel with the seat’s manual (paper or saved offline) so you can confirm acceptable methods.
Step-by-step checks before leaving the rental lot
Do these checks in the pickup area while you still have time to change cars if something is incompatible. Give yourself at least 15 minutes, longer if you are fitting multiple seats.
1) Pick the best seating position. The centre rear can be safest in some crashes, but only if you can install the seat correctly and the position has the required belt geometry and anchors. If the centre lacks LATCH and the belt is awkward, an outboard position with a solid install is preferable.
2) Verify recline and stability for rear-facing. Use the seat’s level indicator if it has one. A seat that is too upright can cause head slump in younger infants, and too reclined can reduce crash performance. Adjust within the seat’s allowed range.
3) Install using either lower anchors or seat belt, not both. Most seats do not permit using LATCH and the vehicle belt together. Choose the method appropriate for the seat stage, the vehicle position, and weight limits.
4) Tighten and test at the belt path. Grip the seat near where the belt or lower anchor strap passes through. Try moving it side-to-side and front-to-back. It should move less than one inch. Movement at the top of the seat can be greater, that is normal, but the belt path must be secure.
5) Top tether for forward-facing harnessed seats. Attach, remove slack, and ensure the strap is not twisted. Confirm it is clipped to the correct anchor point, not a cargo hook.
6) Harness fit on the child. Rear-facing harness straps should come from at or below the shoulders, forward-facing from at or above. Buckle, tighten until snug, and do the pinch test at the collarbone, you should not be able to pinch slack. Position the chest clip at armpit level.
7) Check for interference. Ensure the child seat is not pressing hard against a front seat in a way your seat manual forbids. Also check that the vehicle seatback is locked in place and that no vehicle seat belts are trapped or twisted.
8) Keep the seat belt from re-locking issues later. If you used a switchable retractor, remember it will stay in locking mode until fully retracted. If you unbuckle and let the belt retract, you will need to re-engage locking mode when reinstalling.
Common rental-car quirks in New York that affect child seats
Different trim levels within the same category. Two cars that look similar can have different anchor availability, head restraints, or buckle stalk lengths. Treat every new vehicle as a fresh inspection, even if you had the “same model” last trip.
Third-row and cargo-area tether locations. If you are using a larger vehicle, tether anchors can be in the floor or on the back of a seat. Make sure you are using the anchor for the correct seating position, because they are not always interchangeable.
Seat protectors and add-ons. Many car seat manufacturers prohibit thick mats, protectors, or belt-positioning gadgets. In a car hire vehicle, it can be tempting to add padding to protect upholstery, but it can compromise tightness.
Cold-weather clothing. In winter conditions around New York, bulky coats can create hidden harness slack. Buckle the child in without a bulky coat, then place a blanket over the harness if needed.
When to ask for a different vehicle
Switch vehicles before you drive off if any of these occur: no suitable tether anchor for a forward-facing harnessed seat, the belt will not lock and you lack a locking clip solution permitted by the seat, the anchors are damaged or inaccessible, or you cannot reach the less-than-one-inch movement test after repeated attempts. A quick swap at the counter is far easier than trying to improvise later.
FAQ
Is ISOFIX the same as LATCH in a New York rental car? They are similar systems, but US vehicles typically use LATCH terminology. You should look for lower anchors and a top tether anchor, and confirm which seating positions support them.
How do I find the lower anchors if I cannot see them? Feel in the seat crease where the backrest meets the cushion. Look for small child-seat icons on tags or buttons, and confirm you are clipping onto metal bars, not trim.
How can I tell if the seat belt locks for a child seat install? Pull the shoulder belt all the way out, then feed it back in. If it clicks and will not pull out again, the retractor is in locking mode and can secure a car seat.
What is the most important check before leaving the lot? Make sure the seat moves less than one inch at the belt path, and that a forward-facing harnessed seat is tethered to the correct anchor with no twist.
Can I use both LATCH and the seat belt together for extra safety? Usually no. Most child seat manufacturers require you to use either the lower anchors or the seat belt, plus the top tether when forward-facing, so follow the seat and vehicle manuals.


