Quick Summary:
- Photograph each wheel straight-on and at 45 degrees, in sharp focus.
- Capture tyre sidewall, tread depth, and DOT code with raking light.
- Include the number plate and VIN label in the same photo sequence.
- Use a timestamped, unedited burst set, plus a slow walkaround video.
Wheel kerb rash and tyre damage are among the most disputed issues in US car hire because they can be easy to miss at the desk, then hard to prove later. The most convincing pick-up photos do two jobs at once: they show clear, close evidence of the condition, and they link that condition to the exact vehicle you collected. If either part is missing, you may still have photos, but not proof.
This guide gives you a quick, repeatable checklist you can use in California or anywhere in the US. The goal is a simple photo set that a rental agent, insurer, or disputes team can understand without guessing which wheel they are looking at, when it was taken, or which car it belongs to.
If you are collecting at a busy airport, keep your routine consistent. Whether you are picking up via car hire at Los Angeles airport (LAX) or somewhere smaller, the same evidence rules apply: show context first, then details, then a final verification shot that ties everything back to plate and VIN.
Why wheel and tyre photos get disputed
Disputes usually happen for one of four reasons. First, the photos are too far away to show the damage clearly, so the reviewer cannot confirm kerb rash versus dirt or reflection. Second, the photos are close enough but not traceable to the specific car, so they could be from another vehicle. Third, the lighting hides the scuffs, especially on black alloy wheels. Fourth, the tyre evidence is incomplete, showing tread but not sidewall cuts, bulges, or the DOT code that helps date the tyre.
To avoid this, you need a “chain of identification” that runs through your images. The chain is: parking bay context, number plate, full wheel position, close-up of damage, plus a VIN photo. When those pieces appear in one continuous sequence taken at pick-up, your set becomes much harder to challenge.
Before you start, set up your phone for evidence
Spend 30 seconds on settings, it makes every photo more usable.
Turn on: highest available resolution, location tagging, and the correct date and time. If your phone offers a “pro” or manual mode, lock focus when shooting the wheel face so it does not hunt and blur the scrape marks.
Turn off: beauty filters, heavy HDR that can smear fine scratches, and any auto “optimise” mode that creates artificial smoothness. Keep edits for later, and keep the originals untouched. If you need to send evidence, you want the original files with metadata intact.
Use light deliberately: kerb rash shows best with side lighting, not flat overhead illumination. If you are in a dim garage, use your torch at a shallow angle across the wheel edge rather than blasting flash straight at it.
The repeatable pick-up photo sequence (fast, but thorough)
The simplest way to stay consistent is to do the same order every time: front-left, front-right, rear-right, rear-left. This matches a clockwise walkaround and reduces confusion if you ever need to label photos later.
Step 1: Prove the vehicle identity (plate and wide context)
Start with two wide photos before any close-ups.
Photo A, front three-quarter: stand 2 to 3 metres away and capture the full front corner, including the number plate, headlight, and the front wheel you will inspect first. This creates a “map” for the viewer.
Photo B, rear three-quarter: repeat at the back, ensuring the rear plate is readable if present. In California, plates are generally fitted front and rear, but do not rely on that. Get what is on the car.
These wide images matter because they anchor the later close-ups to one identifiable vehicle. If you are picking up around LA, for example, a large fleet location can have many similar cars parked together. The wide plate shots help separate one identical model from another.
For travellers arranging car rental at Los Angeles LAX, this step is especially useful because multi-level garages create confusing lighting and repeating backgrounds.
Step 2: Photograph the VIN in a way that links to your wheel set
Take a clear, legible VIN photo at pick-up. In US rentals, common VIN locations are the dashboard at the base of the windscreen on the driver side, and a door jamb label.
VIN photo rules: fill most of the frame with the VIN label, ensure every character is sharp, and avoid reflections. Then take one “context VIN” photo from slightly farther back so it is obvious the VIN is on that car, not a loose document.
Linking trick: take the VIN context photo, then immediately take your first wheel photo without pausing to do other subjects. If the images are reviewed in order, the continuity supports the claim that the wheel shots belong to the same vehicle and moment.
Step 3: For each wheel, capture three angles plus one damage close-up
For wheel kerb rash, aim to show both the wheel face and the rim edge where scuffs occur.
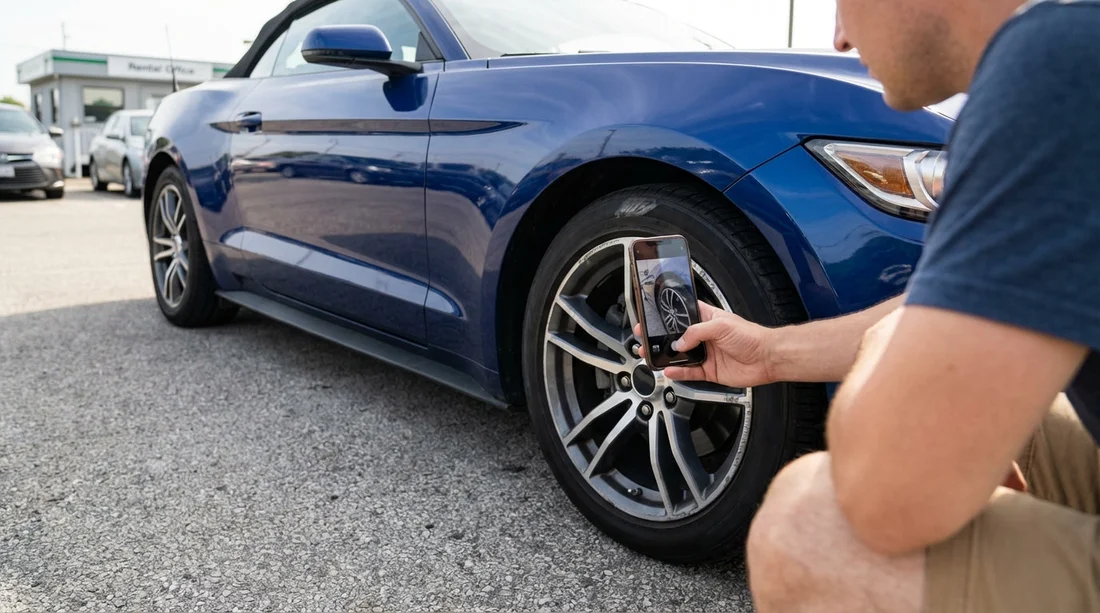
1) Straight-on wheel face: kneel or crouch so the camera is level with the wheel centre cap. Keep the full wheel in frame, including the tyre sidewall. This shows overall condition and identifies the wheel design.
2) 45-degree angle (forward): move slightly toward the front of the car and angle back at the wheel. This brings the rim lip into view and helps reveal gouges that do not show head-on.
3) 45-degree angle (rearward): mirror the shot from the rear side of the wheel. Different scratches catch light from different directions, so this often reveals what the first angled shot misses.
4) Close-up of kerb rash: move in until the damaged section fills the frame. Focus on the rim edge, not the tyre. If possible, include a fixed reference point such as the valve stem or a spoke junction in a second close-up, so it is obvious where on the wheel the damage sits.
Lighting tip: use raking light. Hold your torch or phone light 10 to 20 cm away, to the side of the rim, and sweep slowly. Take a burst of 3 to 5 photos as the light moves, one will usually show the scratch depth and texture clearly.
Step 4: For each tyre, document sidewall, tread, and codes
Tyre disputes are often about sidewall damage, not tread wear. Your photos should prove there was a cut, bulge, scuff, or puncture mark at pick-up, and show which tyre it was on.
Sidewall full view: photograph the entire sidewall in a single shot, with the brand and size markings readable. Then take a second sidewall shot at a slight angle to show any bulges. Bulges can disappear in a flat-on photo.
Tread photo: shoot the tread across the width, close enough to see grooves clearly. If you have a tread gauge, you can photograph it in place, but it is not essential. What matters is sharpness and a reference to the tyre’s overall condition.
DOT code: on US tyres, the DOT code helps identify manufacturing week and year. Photograph the DOT sequence if it is visible on the outer sidewall. If it is only on the inner sidewall, do not risk injury reaching under the car, get as much as you safely can from the visible markings and focus on damage evidence instead.
Damage close-ups: for cuts, bubbles, or chunking, take one close photo and one slightly wider shot that includes a recognisable section of the wheel. That wider shot is what ties the damage close-up to a specific wheel position.
Step 5: Add a one-minute walkaround video for continuity
A slow video can reinforce your photo set by showing that the car and its wheels were in that condition at pick-up. Walk clockwise around the vehicle, pausing for two seconds at each wheel. Keep the plate in view at the start, and if possible, briefly capture the windscreen VIN at the end. The video should not replace photos, it supports them by showing continuity.
Step 6: Make your evidence easy to understand later
You may need to refer to these images days later, after a long drive or a return in poor lighting. Two small habits help a lot.
Use consistent naming: if your phone allows, favourite the best shots for each wheel, or move them into an album named with the pickup date and location.
Record a spoken note: immediately after you finish, record a 10-second voice memo noting the plate, location, and any pre-existing wheel or tyre issues you found. This can help you write a clear message if you later need to raise a query.
California-specific pick-up conditions that affect wheel and tyre photos
In California, airport garages and coastal sun create two opposite problems. Garages at major hubs can be dim, producing blur and noise that hide fine scuffs. Bright sun, common at curbside areas, can create harsh reflections that make wheel faces look perfect when they are not.
In garages: steady your hands, use a torch at an angle, and take two extra shots of each damaged area. Do not rely on one photo.
In direct sun: move your body to cast a soft shadow over the rim, or step to the side so the rim lip is not reflecting sky glare into the lens.
If you are collecting in Northern California for a longer road trip, such as arranging an SUV via SUV rental at San Francisco SFO, tyre sidewalls deserve extra attention. Longer highway runs can heat tyres, and you want clear proof of any pre-existing bubbles or cuts before you set off.
What “proves” pre-existing damage, and what does not
Strong proof looks like: a time-ordered set with plate, VIN, and wheel close-ups where the damage is sharp, lit from the side, and clearly on the rim edge or tyre sidewall. Ideally, you can identify the wheel position from the surrounding bodywork and the order of the walkaround.
Weak proof looks like: a single blurry close-up of a scrape with no context, no plate, and no VIN, or photos taken later at the hotel. Even if the damage is real, it becomes easier to argue it happened after collection.
Also avoid: screenshots of messaging apps or compressed uploads as your only record. Keep the original camera files. If you do share evidence, send copies, not the originals, so your master set remains intact.
How to raise wheel or tyre condition at pick-up, without slowing everything down
If you spot kerb rash or tyre damage, photograph it first, then mention it to staff while you are still at the vehicle. The key is to keep the conversation factual and tied to your evidence: “front-left wheel has visible rim rash at the 2 o’clock position, and the tyre sidewall has a scuff.” If they provide a condition report, confirm that the marks are noted, and keep your own photos regardless.
At high-throughput desks, including those serving car hire at San Diego, staff may not walk out with you. That is fine, your goal is to create a complete visual record at pick-up, and then keep it alongside the paperwork.
Extra checklist: wheel and tyre details that are worth capturing
If you have an extra minute, these optional shots can help resolve edge cases:
Wheel centre cap and lug area: shows tampering or missing caps that could be blamed on you.
Valve stem area: helps locate a kerb rash section and shows pre-existing damage near the valve.
One shot with the wheel and a nearby body panel: ties position on the car, useful if wheels are similar front and rear.
Spare tyre or tyre repair kit: not a wheel rash issue, but can matter if you later discover a slow leak and need to show what was supplied.
For longer drives starting in the South Bay, such as collections linked with Payless car rental at San Jose SJC, these extras can be useful because you may be far from the pickup location when an issue becomes obvious.
FAQ
What pick-up photos best prove existing wheel kerb rash on US car hire?
Take a straight-on wheel photo, two 45-degree angles, then a close-up with side lighting that shows scratch texture. Add a wider shot that includes part of the car so the wheel position is clear.
How do I link wheel and tyre photos to the exact rental car?
Start with wide plate photos, then capture a sharp VIN photo and immediately begin your wheel sequence in order. Keeping the shots consecutive, with location and time metadata, builds a clear chain of identification.
Is a walkaround video enough if I forget close-ups?
A video helps with continuity, but it rarely shows fine rim scratches or small sidewall cuts clearly. Use video as support, and rely on sharp close-ups for the actual proof of damage.
What lighting shows kerb rash and tyre scuffs most clearly?
Raking light from the side is best. In a garage, use a torch at a shallow angle across the rim edge. In bright sun, avoid glare by shading the wheel and shooting from a slightly different angle.
Should I photograph the DOT code on the tyre for evidence?
Yes, if it is safely visible. A readable DOT code can help identify the tyre and support your timeline, but clear photos of the damage area and its position on the car matter more.


