Quick Summary:
- Photograph windscreen and bonnet in daylight before leaving the rental lot.
- Record close-ups with a coin for scale, plus wide context shots.
- Log any chips on the rental agreement, and keep time-stamped evidence.
- If a chip spreads, stop safely, photograph, and notify the provider.
Stone chips happen in Texas. Long highway miles, construction zones, and trucks carrying gravel can kick up debris that marks the windscreen or bonnet paint. With car hire, the key is not only avoiding damage where possible, but documenting the car’s condition so you are not held responsible for pre-existing chips, and so any new damage is handled fairly.
This guide gives you a repeatable inspection and photo routine for pick-up and return, with extra focus on windscreens and bonnet paint. It also covers what to do immediately if a chip spreads mid-rental, including how to protect your safety and your paperwork.
Why stone chips matter on Texas highways
In Texas, high-speed routes and frequent roadworks make minor impacts more likely. A tiny chip can become a crack with heat, vibration, or a sudden temperature change from air conditioning on a hot day. Windscreens are safety-critical, and many providers treat windscreen damage differently from bodywork scuffs because it can worsen quickly.
The practical takeaway for car hire is simple. You need clear, time-stamped evidence at two moments, before you drive away and when you return. That evidence should show both close detail and context so it is easy for staff to match your photos to the exact vehicle.
What you need before leaving the lot
Bring what you already have in your pocket, plus a couple of small helpers.
Phone settings: Turn on date and time capture if available. Use the standard camera app, avoid beauty filters, and keep the resolution high. If your phone supports it, enable location tagging for the photo metadata.
Lighting: Daylight is best. If you are in a covered garage, move the car to a well-lit area if permitted, or use your torch mode and angle the light across the glass to reveal chips.
A scale marker: Carry a coin. It helps show size in close-ups without guesswork.
A clean wipe: Lightly wipe dust off the windscreen and bonnet. Do not polish. You only want to remove loose dirt so chips are visible.
If you are collecting from a major airport location, you may want to allow an extra ten minutes for a careful check. Hola Car Rentals has location pages that can help you plan pick-up logistics, for example car hire at Dallas DFW and car hire in Austin AUS.
The pick-up inspection routine, step by step
Do the same routine every time. Consistency makes your documentation more credible, and it reduces the chance you miss something.
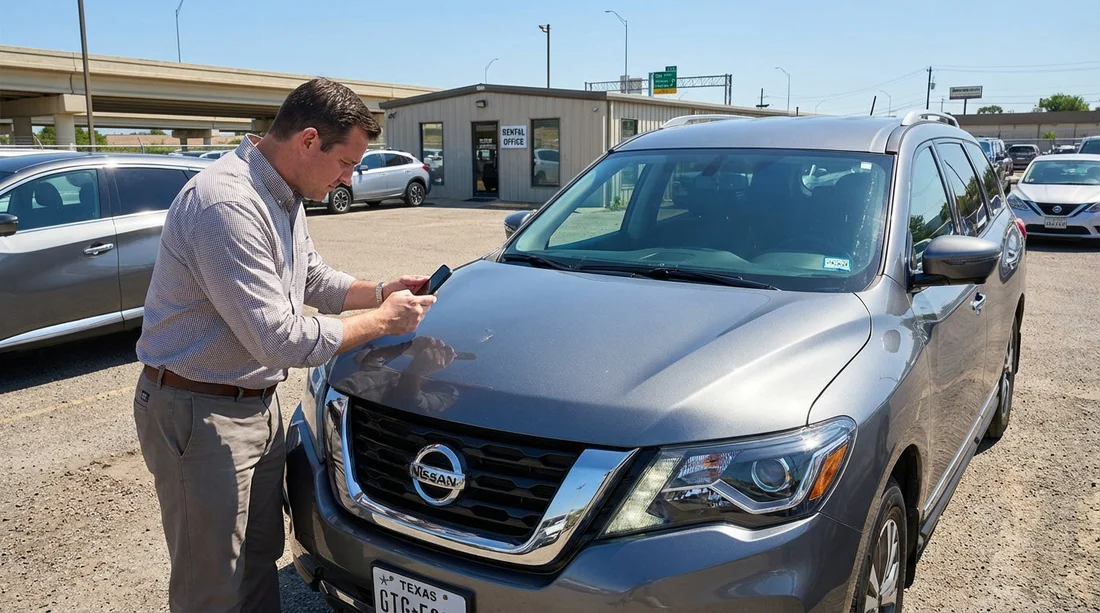
Step 1: Confirm you are documenting the right car. Start with two wide photos of the entire vehicle, front three-quarter and rear three-quarter. Then photograph the number plate and the vehicle identification sticker area (often inside the driver door). If you cannot access a VIN label easily, at least capture the number plate and a wide shot that shows the car’s colour and model.
Step 2: Windscreen sweep, outside first. Stand about one metre away and photograph the full windscreen straight on. Then take four angled shots, one from each corner. Chips often show only when light hits at an angle, so tilt slightly and let reflections move across the glass.
Step 3: Close-ups of any marks. If you see a chip, take three close-ups, one without flash, one with flash, and one with your coin beside it for scale. Then take a mid-range shot that shows where it sits, for example lower passenger side near the wiper line. Finish with a context shot that includes a landmark on the car, such as the A-pillar or rear-view mirror mount, so the location is unmistakable.
Step 4: Wiper line and edges. Carefully inspect the bottom edge of the windscreen where wipers sweep. Also check the perimeter near the rubber seals. Edge chips are more likely to turn into cracks.
Step 5: Bonnet paint and leading edge. Walk to the front of the car. Photograph the bonnet from above and at a shallow side angle. Stone impacts usually appear on the leading edge and in the centre line, so scan slowly. Repeat the same close-up, scale, and context photo pattern for any chips in the paint.
Step 6: Mirrors, headlights, and grille. Chips in headlight lenses and fog lights can be confused with cracks. Take a quick photo of each headlight and mirror housing. This also supports your story if debris hit the car at speed.
Step 7: Time-stamped proof that you did this at pick-up. Take one final photo that shows the car and something that anchors time, such as the rental facility signage or the dashboard screen with the time visible if it displays it. Do not get distracted, your goal is simply to show you photographed the condition before leaving.
Step 8: Get it written down. If the check-out report is digital, ensure the pre-existing chips are marked. If a staff member says “it’s fine”, ask for it to be noted anyway. Your photos are strong evidence, but a written record reduces debate later.
How to label, store, and back up your evidence
A good photo is only useful if you can find it quickly at return.
Create one album named “Texas car hire pick-up” with the date, and put all images inside. Add a second album for return photos. If you prefer, email the key images to yourself so the timestamps are clear and the files are backed up.
Do not edit the originals. Cropping and drawing circles can be helpful for explaining, but keep the untouched originals too. If you need to share images at the desk, send copies.
Write a short note in your phone, listing any chips you found and where they are. For example, “Windscreen, small chip, lower right near wiper sweep. Bonnet, two pin chips, front leading edge.” These notes help if you are tired at drop-off.
Mid-rental, what to do if a chip spreads into a crack
If you hear a ping and later notice a crack growing, treat it like a safety issue first, and an admin issue second.
1) Stop somewhere safe. Do not pull onto the shoulder of a fast highway if it is unsafe. Take the next exit, a rest area, or a well-lit car park. In Texas heat, glass can worsen quickly, so prompt action matters.
2) Photograph immediately. Take a wide photo of the whole windscreen, then a close-up of the origin point, then a mid-range shot showing the crack’s path. Include a coin for scale near the origin point if you can do so safely. If you can, take a short video panning from outside to inside, showing that the crack is in the glass rather than a surface smear.
3) Record the circumstances. Note the approximate location, time, road conditions, and what happened, such as “passed truck, heard impact, chip appeared”. Avoid guessing about fault. Stick to observable facts.
4) Notify the provider as soon as possible. Use the contact method provided in your rental documents or app. Early notice can affect repair options. A small chip may be repairable, but a long crack often means replacement.
5) Reduce stress on the glass. Avoid blasting cold air directly onto the windscreen. Park in shade when possible. Drive smoothly and avoid potholes. These steps cannot reverse a crack, but they may slow spreading until you receive instructions.
6) Follow instructions on repair and replacement. Some providers authorise a specific glass shop. Others may arrange a swap vehicle. Keep receipts and written approvals if you pay anything. If the car becomes unsafe to drive, ask for guidance rather than continuing at speed.
If your trip takes you through major hubs where provider support is common, Hola Car Rentals location pages can help you understand local pick-up and return points, such as Avis car rental at Houston IAH or Dollar car rental in Texas at IAH.
The return routine, mirror your pick-up evidence
At return, you want to prove the condition is unchanged, or clearly show any new damage was reported and handled correctly.
Refuel and clean lightly if needed. You do not need a full wash, but remove heavy mud or bugs that could hide a chip on the bonnet edge. A quick wipe of the windscreen helps too.
Take return photos before you hand over keys. Aim for the same angles as pick-up, wide front and rear three-quarter shots, number plate, full windscreen, angled windscreen corners, bonnet from above and at a shallow angle, and close-ups of any existing chips you documented earlier. If lighting is different, take extra angles to avoid reflections hiding details.
Capture the mileage and fuel gauge. While not directly related to chips, a dashboard photo helps establish the moment of return and supports the timeline of your return set.
Ask for a condition confirmation. If staff can inspect the car with you, do it. If the return is after-hours, take a photo showing where you parked and any signage, and keep the time-stamped set of images as your protection.
If you are returning around the Dallas area, having a clear plan for the facility layout can help you find good lighting and space for photos. See car rental at Dallas DFW for location context.
Common disputes, and how strong documentation prevents them
“That chip wasn’t there at pick-up.” Your best answer is a wide windscreen photo that clearly shows the chip’s position, plus a close-up with scale and a context shot. If you also had it written on the check-out report, the dispute typically ends quickly.
“The mark is a crack, not a chip.” This can happen if a small chip grows. That is why immediate mid-rental photos matter, they show the starting point and the early stage. Your note about the time and road conditions also helps.
“We can’t match this photo to our vehicle.” This is why you take number plate shots, wide shots, and a photo near the driver door sticker area. The aim is to make it obvious the images are of your rental car.
“It’s normal wear and tear.” Policies vary by provider. Your job is not to argue definitions on the kerbside. Your job is to have clear evidence and to follow the reporting steps promptly.
Prevention tips that still fit normal Texas driving
You cannot eliminate stone chips, but you can reduce the odds.
Increase following distance behind trucks and vehicles carrying loose material. Many chips happen when you sit in the direct line of debris.
Avoid freshly resurfaced lanes where gravel is present. If you see “loose gravel” warnings, slow down smoothly and keep distance.
Do not tailgate in construction zones. Texas roadworks are common, and temporary surfaces can throw small stones.
Park away from active worksites when possible. Wind can blow grit onto paint, and door openings in tight spaces can add unrelated scuffs that complicate return checks.
FAQ
How many photos should I take for car hire pick-up in Texas? Aim for 20 to 40 photos. Cover wide angles of all sides, then detailed shots of the windscreen and bonnet, and close-ups of any chips with a scale marker.
Should I report a tiny windscreen chip if it is smaller than a coin? Yes. Small chips can still spread into cracks, especially with heat and vibration. Report it and ensure it is noted on the condition report, even if it looks minor.
What if I only notice a chip after I have left the lot? Pull over somewhere safe as soon as practical, take photos in good light, and contact the provider to add it to the record. The sooner you document it, the more credible your evidence.
If a chip spreads mid-rental, can I keep driving? It depends on visibility and safety. If the crack obstructs your view or is rapidly growing, stop and request guidance. Drive cautiously and avoid temperature shocks to the glass.
Do my phone photos count as proof at return? They often help a lot, especially if they are time-stamped, unedited originals with both close-ups and wide context shots. Combine photos with written notes and any messages sent to the provider.


